Section I: The Foundation – Safety, Tools, and the "Zen" of the Bench
Before you ever melt a drop of solder, you have to respect the power inside the chassis. A tube amplifier is a beautiful machine, but it’s one of the few hobbies where the device can hold a lethal charge even when it's unplugged.
1. The "Golden Rule" of Safety
-
The One-Hand Rule: When probing a live circuit, keep one hand in your pocket. This prevents electricity from traveling through your chest (and heart) if you touch a high-voltage point.
-
Capacitor Discharge: Large filter capacitors act like batteries. Learn to use a discharge tool (a high-wattage resistor with alligator clips) to bleed off stored energy before touching anything.
-
The "Death Cap": Identifying and removing or bypassing dangerous vintage grounding schemes (like the 2-prong "death cap" setups) in older amps.
2. The Essential Tool Kit
To build something that lasts, you need tools that don't quit.
-
The Soldering Station: A 40-60W adjustable station (like a Hakko or Weller). You need consistent heat to flow solder onto heavy transformer lugs without creating "cold joints."
-
The Digital Multimeter (DMM): Your eyes inside the circuit. It must be rated for at least 600V DC to safely measure plate voltages.
-
Lead-Based vs. Lead-Free Solder: Why 63/37 Eutectic solder is still the "gold standard" for DIY builders (it flows better and solidifies instantly).
-
Hand Tools: High-quality needle-nose pliers, wire strippers, and a nibbler or step-drill bit for chassis work.
3. Literacy: Schematics vs. Layouts
-
The Schematic (The Map): A logical diagram showing how electrons flow. It tells you what is connected to what.
-
The Layout (The Terrain): A physical drawing of where parts actually sit in the box.
-
The StillAmpd Tip: Never trust a layout alone. Always cross-reference it with the schematic to ensure a "drawing error" doesn't blow your output transformer.
4. Setting Up Your Workspace
-
Lighting & Ventilation: Solder fumes aren't your friend. Use a small fan or fume extractor.
-
Organization: Use muffin tins or magnetic trays for hardware. A "StillAmpd" bench is a clean bench—clutter leads to short circuits.
5. The StillAmpd Safety Checklist
Before you ever plug in or reach into a chassis, run through this "pre-flight" checklist. Treat the amplifier like a loaded firearm: assume it is "hot" until you personally verify it isn't.
-
[ ] The "One-Hand" Rule: Is my non-dominant hand in my pocket or behind my back while probing a live circuit?
-
[ ] Capacitor Discharge: Have I used a discharge tool on the filter caps?
-
[ ] Verification: Did my Multimeter confirm 0V DC at the plates and filter caps before I touched the board?
-
[ ] Bench Environment: Is my work surface non-conductive (wood or rubber mat)? Are there any stray wire clippings or solder blobs hiding under the chassis?
-
[ ] Isolation: Is the amp plugged into a GFCI outlet or an isolation transformer?
-
[ ] Visual Inspection: Are there any charred resistors, leaking caps, or wires touching the chassis that shouldn't be?
-
[ ] Gear Check: Am I wearing safety glasses? (Solder can "spit," and clipping component leads creates flying needles).
-
[ ] The "Sniff" Test: Do I smell ozone, burning electronics, or "hot" transformers? If so, power down immediately.
Section II: Anatomy of an Amp – The Signal Path & Power
If the Foundation is the "how," Section II is the "why." To build or mod an amp, you have to understand how a tiny, weak signal from a guitar pickup turns into a room-shaking roar. Think of the signal path like a series of interconnected rooms, each with a specific job.
1. The Power Supply (The Engine Room)
The power supply's job is to take the 120V AC from your wall and turn it into high-voltage DC (B+) for the tubes.
-
The Power Transformer (PT): The "Big Iron." It steps up voltage for the plates and steps down voltage for the heaters.
-
Rectification (Tube vs. Solid State):
-
Tube (GZ34/5Y3): Offers "sag"—a natural compression when you hit a chord hard.
-
Solid State (Diodes): Faster, tighter, and punchier.
-
Filtering: Large electrolytic capacitors and chokes smooth out the "ripple" from the AC, preventing 60Hz hum from entering your audio.
2. The Preamp (The Voice)
This is where the magic happens. The preamp takes your millivolt-level guitar signal and boosts it enough to drive the rest of the amp.
-
Gain Stages: Usually powered by a 12AX7. Each stage "enlarges" the signal waveform.
-
Coupling Capacitors: These act as gates—they allow the AC guitar signal to pass through to the next stage while blocking the high-voltage DC that would fry the next tube.
-
Cathode Resistors/Caps: These determine how "hot" or "cold" the tube is biased, which dictates the grit and feel of the overdrive.
3. The Tone Stack (The Sculptor)
Most guitar tone stacks are "passive," meaning they only cut frequencies; they don't actually boost them.
-
The Big Three: Treble, Mid, and Bass.
-
Insertion Loss: Because these circuits "suck" energy out of the signal, they are usually followed by another gain stage to make up the lost volume.
-
The "Slope" Resistor: A single resistor that determines where the "mid-scoop" happens. Changing this is one of the easiest ways to re-voice an amp.
4. The Phase Inverter (The Splitter)
In "Push-Pull" amps (like a Deluxe Reverb or Plexi), the signal must be split into two identical but opposite halves.
-
One half pushes the speaker, the other pulls.
-
This is the "bridge" between the preamp and the power tubes.
5. The Power Amp & Output Transformer (The Muscle)
This is the final stage where the signal gets massive.
-
Power Tubes: 6V6/6L6 (American/Fender style) provide glassy cleans and big bass. EL84/EL34 (British/Vox/Marshall style) provide mid-range growl and chime.
-
The Output Transformer (OT): Perhaps the most critical component. Tubes operate at high voltage/low current, but speakers need low voltage/high current. The OT "matches" the impedance so the power can actually move the speaker cone.
6. The Feedback Loop (The Governor)
-
Many amps take a small amount of signal from the speaker jack and "feed it back" into the preamp. This flattens the frequency response, reduces distortion, and makes the amp feel "tighter." Disconnecting it makes an amp feel raw and wild.
Section III: The Build Process – From Bare Chassis to Fire-Up
This is where the "Zen" of StillAmpd meets the grit of the workbench. Building an amp isn't just about following a recipe; it’s about mechanical integrity and electrical "cleanliness." If your lead dress is messy, your amp will be noisy.
1. Chassis Prep & Mechanical Assembly
Before you touch a soldering iron, you have to do the "heavy lifting."
-
Mounting the Iron: Transformers and chokes go on first. Position them so their magnetic fields don't interfere with each other (the 90-degree rule: if one transformer's windings run North-South, the next should run East-West).
-
Sockets & Pots: Install tube sockets with the "key" facing the direction that allows for the shortest wire runs.
-
The Ground Lug: Drill a dedicated hole near the power cord entry for your safety earth ground. This is non-negotiable for a safe build.
2. The Art of Heater Wiring
The heaters (the orange glow in the tubes) run on AC voltage, which is a prime source of 60Hz hum.
-
The Twist: Use a drill to tightly twist your heater wires (usually green). This "cancels out" the electromagnetic interference.
-
Routing: Keep heater wires tucked into the corners of the chassis, away from sensitive signal wires (like the ones going to the volume pot).
3. Populating the Board (The Brains)
Whether you’re using a Turret Board, Eyelet Board, or Point-to-Point:
-
Component Orientation: Aim for a clean, logical flow. Keep resistors elevated slightly off the board to allow for heat dissipation.
-
Mechanical Connection: Wrap the component lead around the turret or eyelet before soldering. The solder is there to conduct electricity, not to hold the part in place mechanically.
-
Heat Sinking: When soldering delicate capacitors, use a small clip on the lead to soak up excess heat so you don't melt the internal film.
4. Lead Dress (The Secret Sauce)
"Lead dress" refers to how you route the wires inside the chassis. A beautiful amp is a quiet amp.
-
The "Grid" vs. "Plate" Rule: Never run input wires (Grid) parallel to output wires (Plate). If they must cross, cross them at a 90-degree angle to minimize "crosstalk" or oscillation.
-
Short & Direct: Every extra inch of wire is an antenna for noise. Cut your wires to the "just right" length—enough to have a tiny bit of slack for repairs, but no "spaghetti."
5. Grounding Schemes: Ending the Hum
Bad grounding is the #1 cause of "new build" headaches.
-
Star Grounding: Bringing every ground wire to a single, central bolt on the chassis.
-
Bus Grounding: A thick copper wire running along the back of the pots where preamp grounds attach, eventually hitting the chassis near the input jack.
-
The Golden Rule: The power supply ground and the input jack ground should be kept separate until they meet at the main chassis ground point.
6. The Final Inspection
Before you apply power, perform a "Chopstick Test" (while the amp is unplugged!). Use a wooden chopstick to poke every wire and joint to ensure nothing is loose and no stray strands of wire are touching the chassis.
Section IV: Startup & Troubleshooting – The "Smoke Test"
The moment of truth. This is where your preparation meets reality. We never just "flip the switch" and hope for the best; we ramp up safely.
1. The Light Bulb Limiter (Your Safety Net)
Before plugging directly into the wall, use a DIY Light Bulb Limiter (a simple circuit with a 60W-100W incandescent bulb in series with the amp).
-
The Tell: If the bulb glows bright and stays bright, you have a dead short. Power down immediately.
-
The Goal: The bulb should flash bright (charging the caps) and then dim down to a dull orange glow.
2. The Voltage Chart
Before installing the expensive vacuum tubes, check your voltages.
-
Heaters: Verify ~6.3V AC at the heater pins.
-
B+ Rail: Check the DC voltage at the filter caps.
-
The Chart: Document every pin of every socket. Compare these to the "target" voltages on your schematic.
3. The Live Chopstick Test (Finding the Gremlins)
Once the amp is tubed and biased, you may encounter hum, hiss, or "motorboating" (low-frequency pulsing).
-
The Tool: Use a non-conductive wooden or plastic chopstick. Never use a screwdriver or metal tool.
-
The Technique: With the amp on and connected to a speaker (and your "one hand in pocket"), gently poke and move wires.
-
What to Look For:
-
Lead Dress Hiss: If moving a wire closer to the chassis stops a squeal, you’ve found a lead dress issue.
-
Cold Joints: If tapping a joint causes a "crackling" sound through the speaker, that joint needs to be reflowed.
-
Microphonics: If tapping a specific tube or capacitor sounds like a "thump" in the speaker, that component is microphonic and may need replacement.
4. Biasing 101
"Biasing" is like setting the idle on a car engine.
-
Fixed Bias: You adjust a small potentiometer inside the amp to set the current flowing through the power tubes.
-
Cathode Bias: The amp sets itself via a large resistor (common in Vox AC15s or Tweed Champs).
-
The Sweet Spot: You’re looking for the balance between "too cold" (thin, sterile sound) and "too hot" (glowing red plates and short tube life).
5. Common First-Build Failures
-
The Silent Amp: Usually a missed ground connection at the input jack or a "blown" fuse.
-
The Screamer: If the amp squeals the moment you take it off standby, your Output Transformer leads are likely reversed. Swap the two primary wires going to the power tube plates.
-
The Hum: Usually caused by a "ground loop" or poor heater wire twisting.
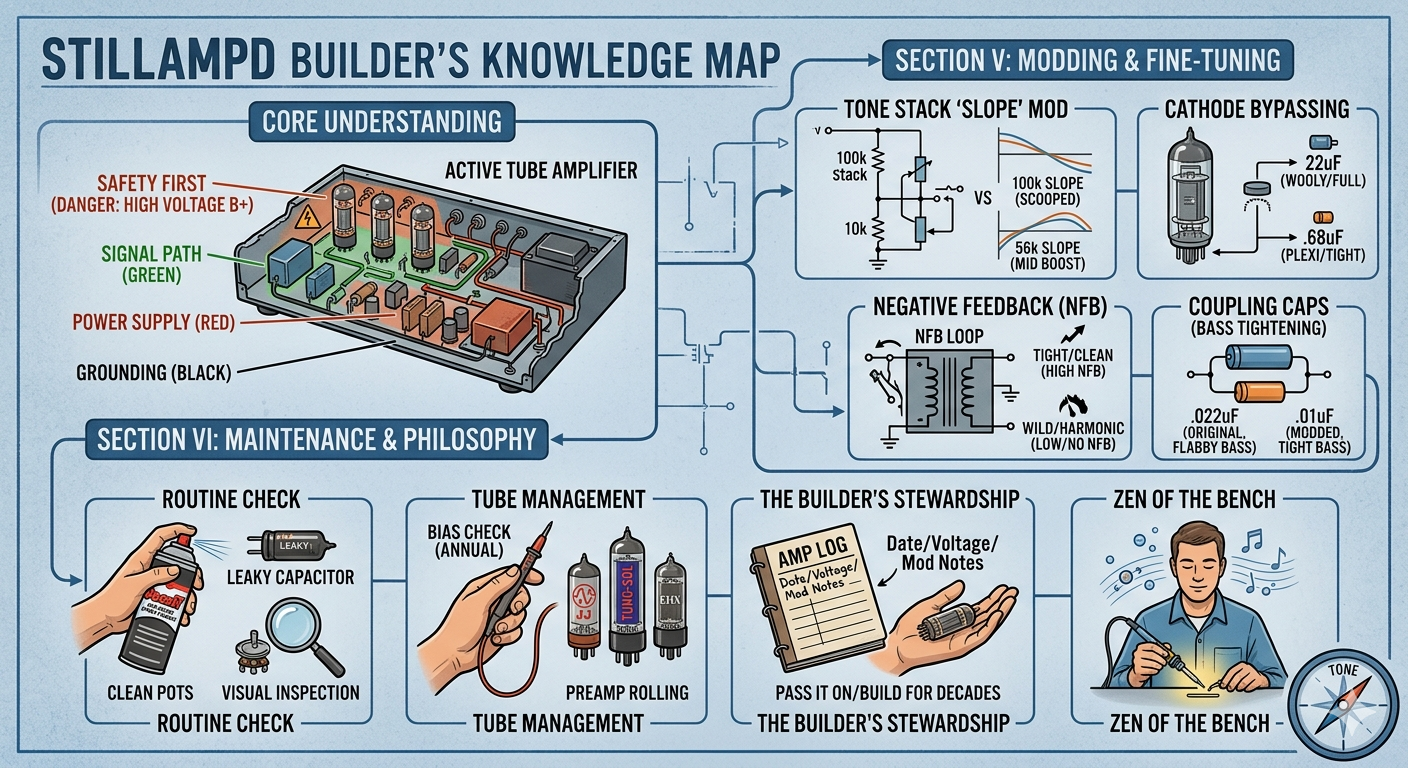
Section V: Modding & Fine-Tuning
Once the amp is stable and safe, the real fun begins. This is where you move from "builder" to "tonal architect." In the StillAmpd philosophy, an amp is never truly finished—it’s just in a state of constant refinement.
1. The Tone Stack "Slope"
-
The Mod: In Fender-style circuits, changing the slope resistor (usually 100k) shifts the "mid-scoop" frequency.
-
The Result: Dropping to 56k adds a thick, Marshall-esque midrange; jumping to 150k creates a thinner, ultra-glassy clean.
2. Cathode Bypassing (Gain Shaping)
-
The Mod: Changing the value of the bypass capacitor on the preamp tube’s cathode.
-
The Result: A large 22uF cap boosts everything (big and wooly). Swapping to a .68uF cap (the "Plexi" trick) cuts the mud and tightens the gain for a cutting, aggressive lead tone.
3. Negative Feedback (NFB) Adjustments
-
The Mod: Adding a potentiometer or a "DPDT" switch to the Negative Feedback loop coming off the speaker jack.
-
The Result: High NFB makes the amp "tight" and "hifi" (great for pedals). Low or no NFB makes the amp "wild," harmonic-rich, and touch-sensitive.
4. Coupling Capacitors: Bass Control
-
The Mod: Changing the value of the caps between gain stages (e.g., from .022uF to .01uF).
-
The Result: This is the best way to "de-fart" an amp that gets flabby when the volume is cranked. Smaller values keep the low-end tight at high gain.
Section VI: Maintenance & The StillAmpd Philosophy
Building the amp is a milestone, but owning and understanding it is the journey. This final section covers how to keep your creation screaming for decades.
1. Routine Maintenance
-
The Visual Inspection: Every six months, pull the chassis and look for "leaky" capacitors (physical bulging) or charred resistors.
-
Cleaning Pots: Use a high-quality contact cleaner (like DeoxIT) to keep your volume and tone controls from crackling.
-
Re-tensioning Sockets: Over time, heat cycles can loosen tube socket pins. Use a small dental pick to gently "re-tension" them for a snug fit.
2. Tube Management
-
Power Tube Longevity: Check your bias once a year. As tubes age, their "idle" can drift, either running too cold (losing tone) or too hot (risking a meltdown).
-
Preamp Rolling: Don't be afraid to swap 12AX7s from different brands (Tung-Sol, JJ, Electro-Harmonix). It’s the easiest, non-soldering mod you can do.
3. The Stewardship of Sound
At StillAmpd, we believe gear shouldn't be disposable.
-
Document Everything: Keep a "Log Book" for your amp. Note the date you changed tubes, the voltages you measured, and every mod you performed.
-
Passing it On: A well-built tube amp can last 50+ years. Build it with the intention that someone else will be playing it long after you're gone.
4. The Zen of the Bench
Building and maintaining gear is a form of meditation. When you're at the bench, the rest of the world fades away. It’s just you, the iron, and the electrons. Stay curious, stay safe, and keep the iron hot.