First Love
“It wasn’t exactly a blind date—more an arrangement on a warm summer night, yes, a rites of passage moment in becoming a man. I had just gotten my first car—a 1960 Ford Falcon— I knew she would fit nicely in the backseat. Not the best part of town. A ‘60s hippie house with a party going full tilt in the dank basement. Music, laughter… the kind of place a kid my age probably shouldn’t have been—but there I was anyway.
And then I saw her. She was beautiful. A little worn around the edges, sure—but with a low, warm voice and a face that lit up the dark room. Short, a bit stout… and yeah, slightly on the heavy side—but somehow it added to her attractiveness. I was 16, strong and able so it was really no great effort carrying her up the stairs. No trouble at all. I knew right then I wasn’t leaving without her. I was pretty proud of myself too… even managed to negotiate a good price.
I’ll never forget my first love. An Ampeg B-18 bass amp—complete with a flip-top, lighted head… two channels, and oh man… those wheels. That first night together was greater than I can put words to. And here we are today. Could it really be almost 60 years. Funny how a man never forgets his first love… and it still feels like yesterday that I brought that amplifier home.” - Al Lowry, Owner
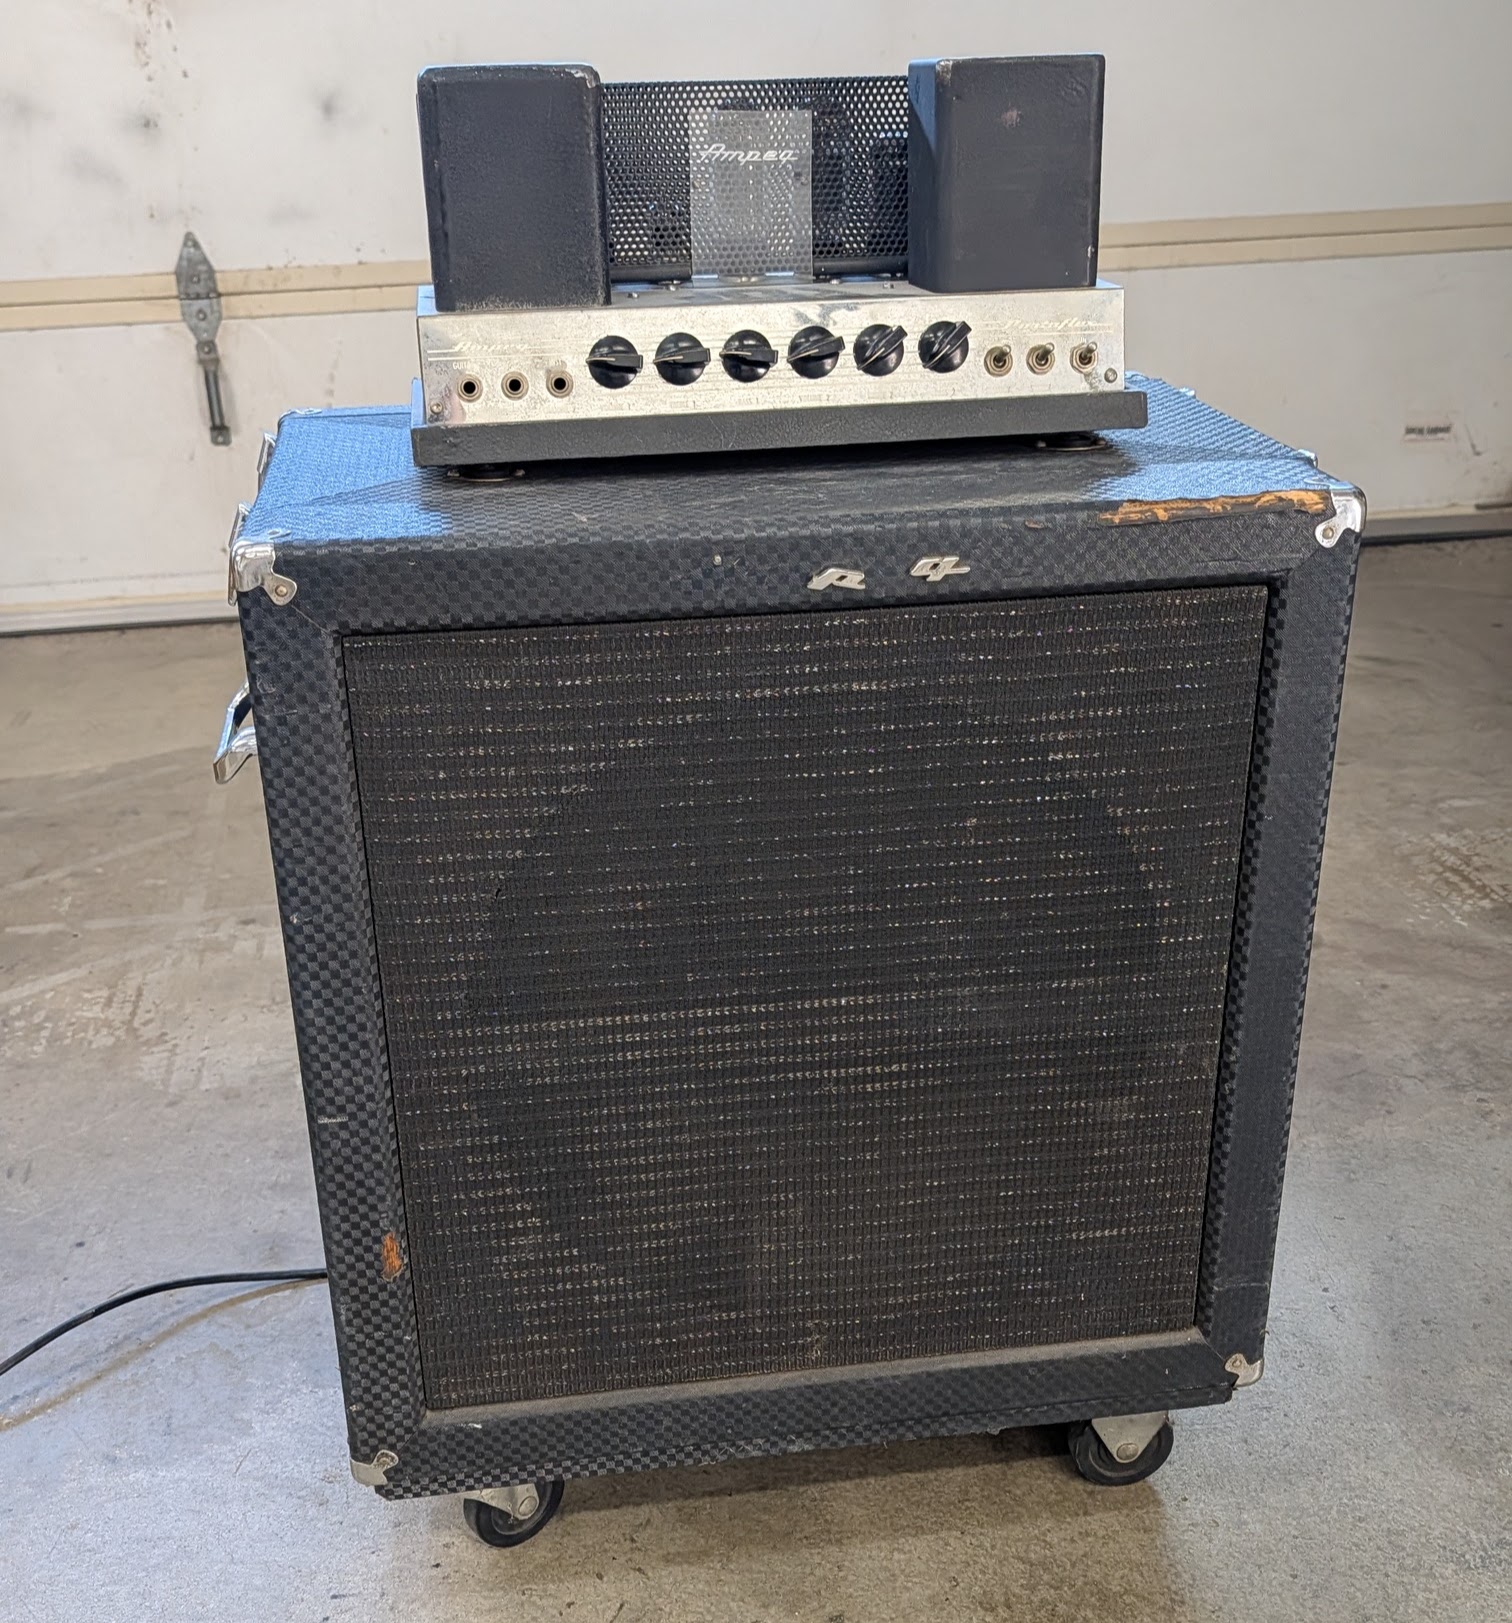
Ampeg B-18N
In the pantheon of bass amplification, the Ampeg B-15N often occupies the throne as the undisputed king of studio recording, yet sitting in its shadow, larger and considerably more imposing, is the B-18N. To look at an Ampeg B-18N is to witness a masterclass in mid-century industrial design, where the functional demands of the working musician met the sophisticated sensibilities of a furniture maker.
The genius of the Portaflex design—where the amplifier head is inverted and stored within the cabinet for transit—is well-documented, but the B-18N takes this concept to a different scale. While the B-15N is defined by its focused, articulate midrange, the B-18N is defined by its sheer displacement. At the heart of this unit is a massive 18-inch speaker, an engineering choice that fundamentally changes the physics of the instrument. It does not simply project sound; it pushes air with a subsonic authority that remains unmatched by smaller, more modern cabinets.
From an electronics perspective, the B-18N is a study in harmonic richness. It utilizes a tube-driven circuit that, when pushed, introduces a complex, musical compression. Unlike the sterile precision of modern solid-state amplification, the B-18N behaves like a living organism. When a bassist strikes a string, the rectifier tube works in concert with the power tubes to create a slight sag, a compression that blooms as the note sustains. It is a forgiving, warm saturation that makes the instrument feel responsive under the fingers.
Historically, this amplifier represents an era when gear was built to be an heirloom. The dovetail joinery of the cabinet, the heavy-duty latching mechanisms for the flip-top lid, and the robust point-to-point wiring within the chassis speak to a time when planned obsolescence had not yet become the industry standard. It was designed to survive the rigors of the road while delivering a sound that could hold its own in a recording session.
For the listener and the player, the B-18N is not just a tool; it is a time machine. Standing before one, you are immediately transported to the quiet, wood-paneled studios of the 1960s. It carries the weight of a thousand low-frequency pulses, a sonic footprint that feels as large as the physical cabinet itself. It is a reminder that in the world of audio engineering, sometimes the most elegant solution is simply to build it large, build it with vacuum tubes, and let the physics of the speaker do the rest.
https://share.google/aimode/zqYfYcj1vSwFrOguH
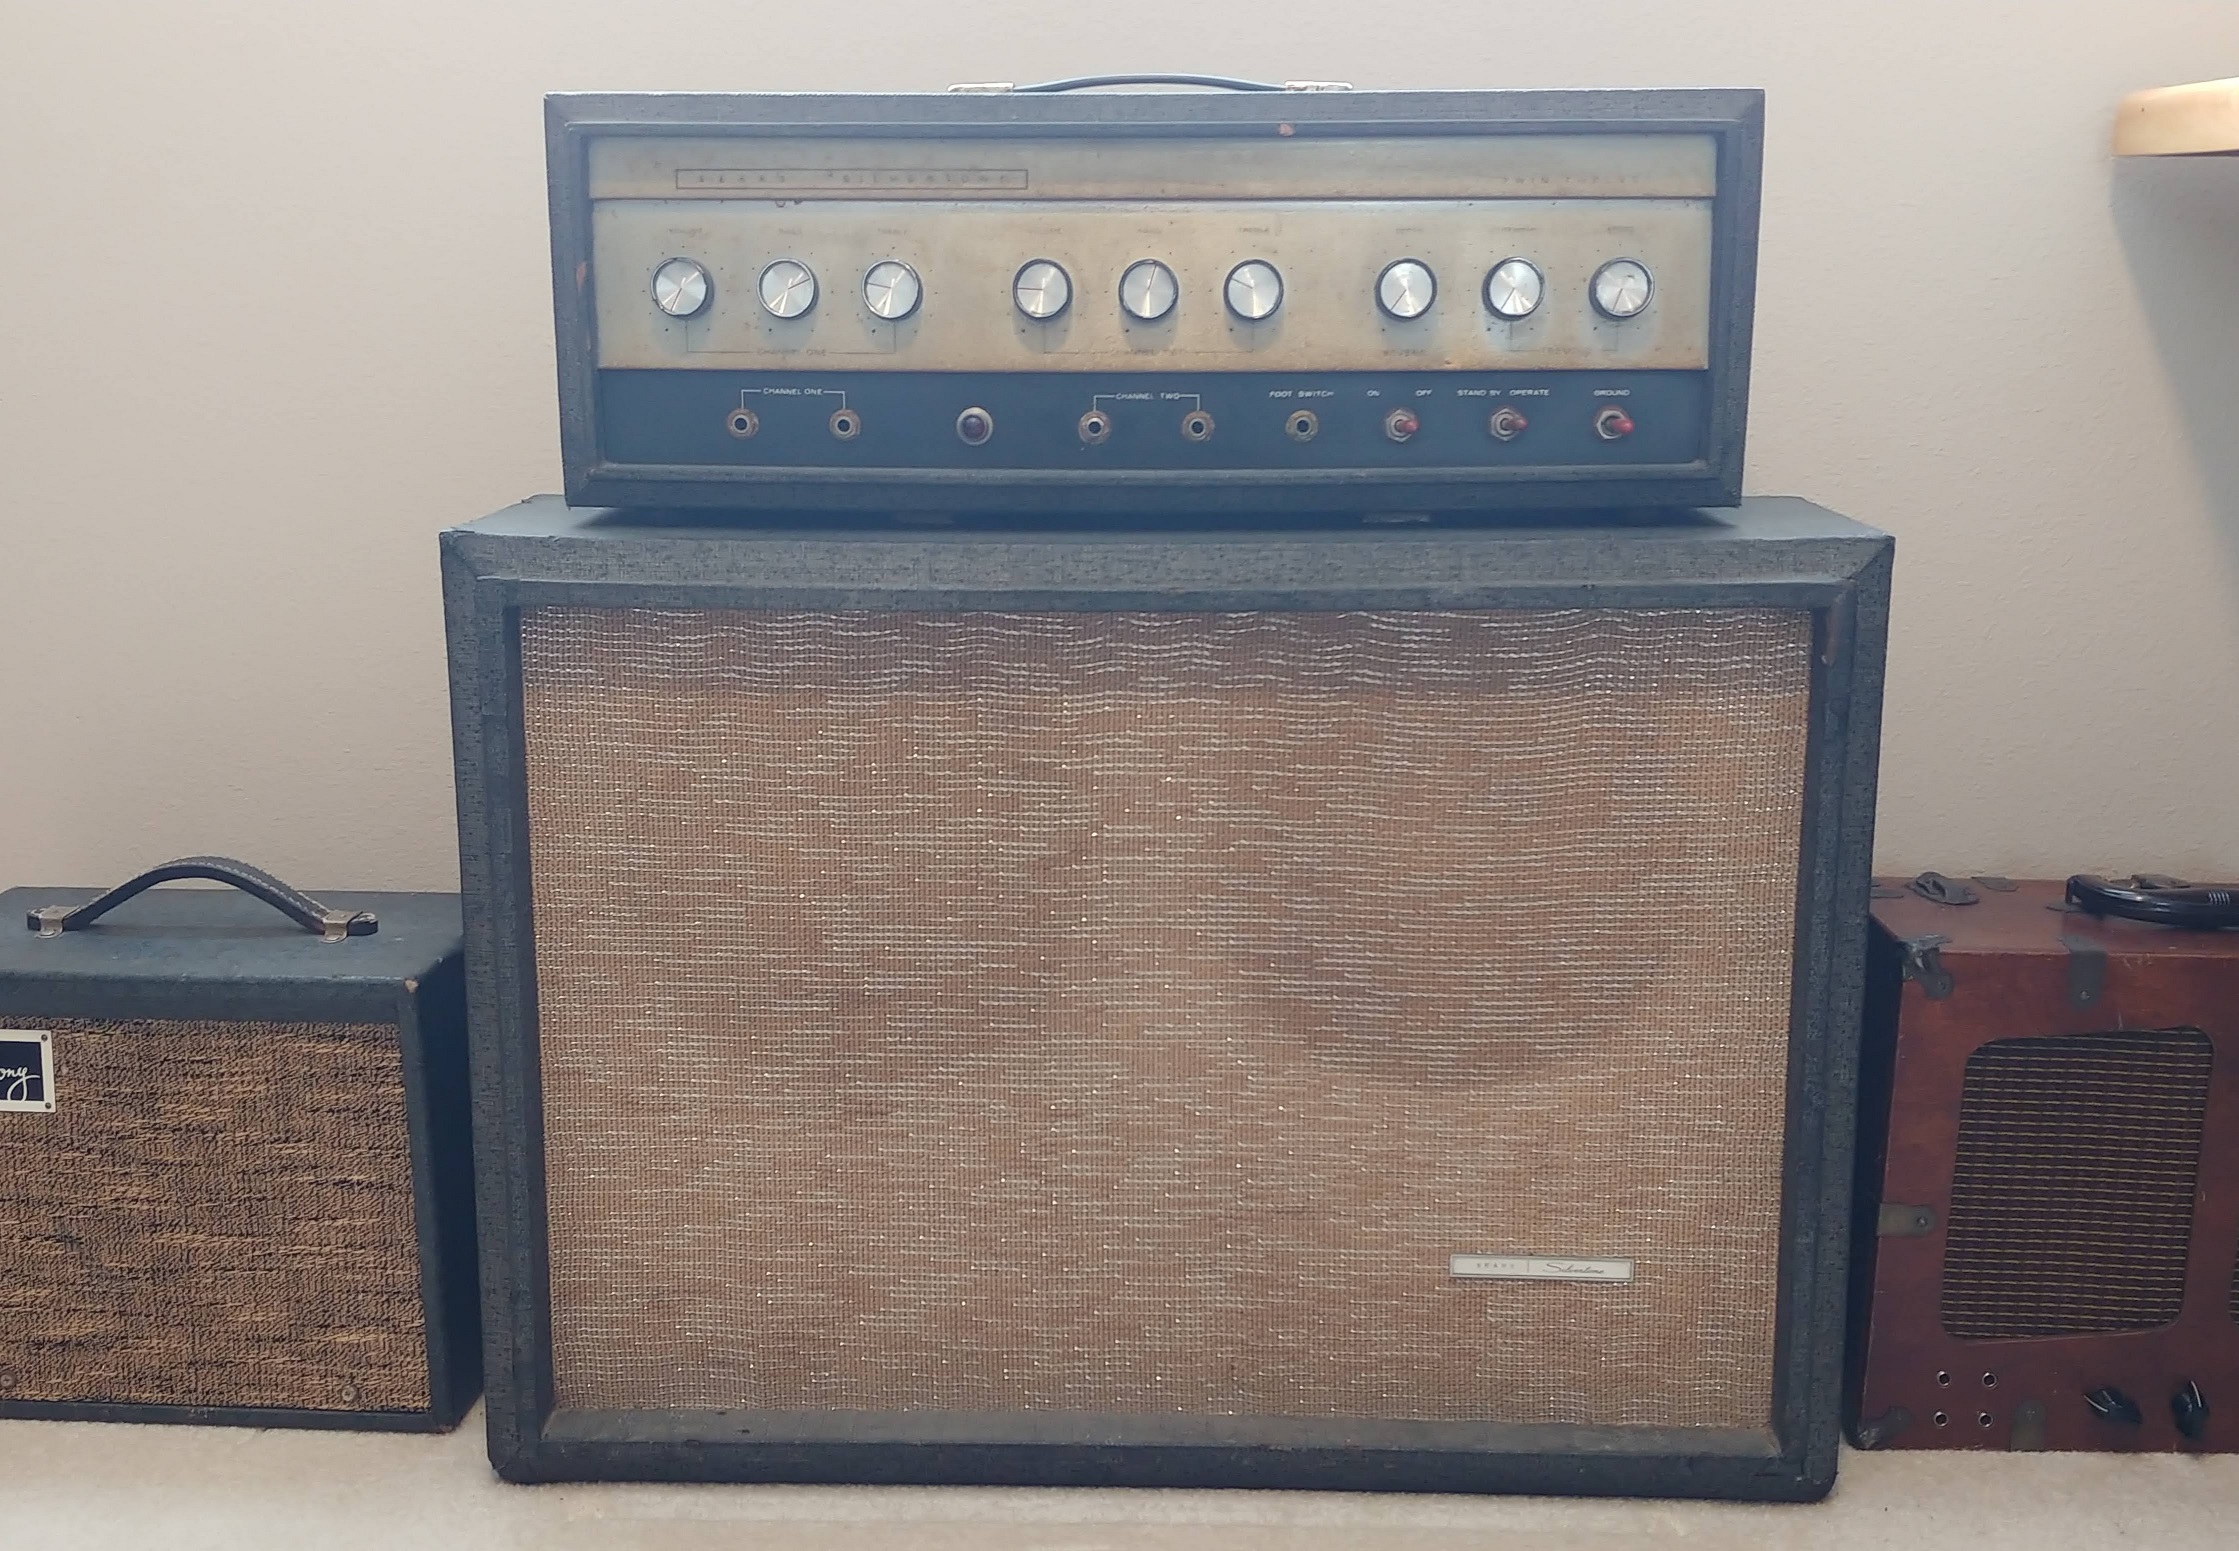
Original as received pictures


Dilemma: Should I Stay or Should I Go
Al Lowry is far more than just a friend and the owner of this amplifier; he is a musical polymath. Whether he is behind the guitar, mandolin, harmonica, bass, or keys, he approaches every instrument with the ear of an accomplished musician, supported by a singing voice that carries the weight of a seasoned performer. Yet, the Ampeg B18N sat in his home like an immovable object. It was a heavy monster, a beautiful piece of engineering that remained a captive of its own size, unable to serve as the traveling companion Al truly needed.
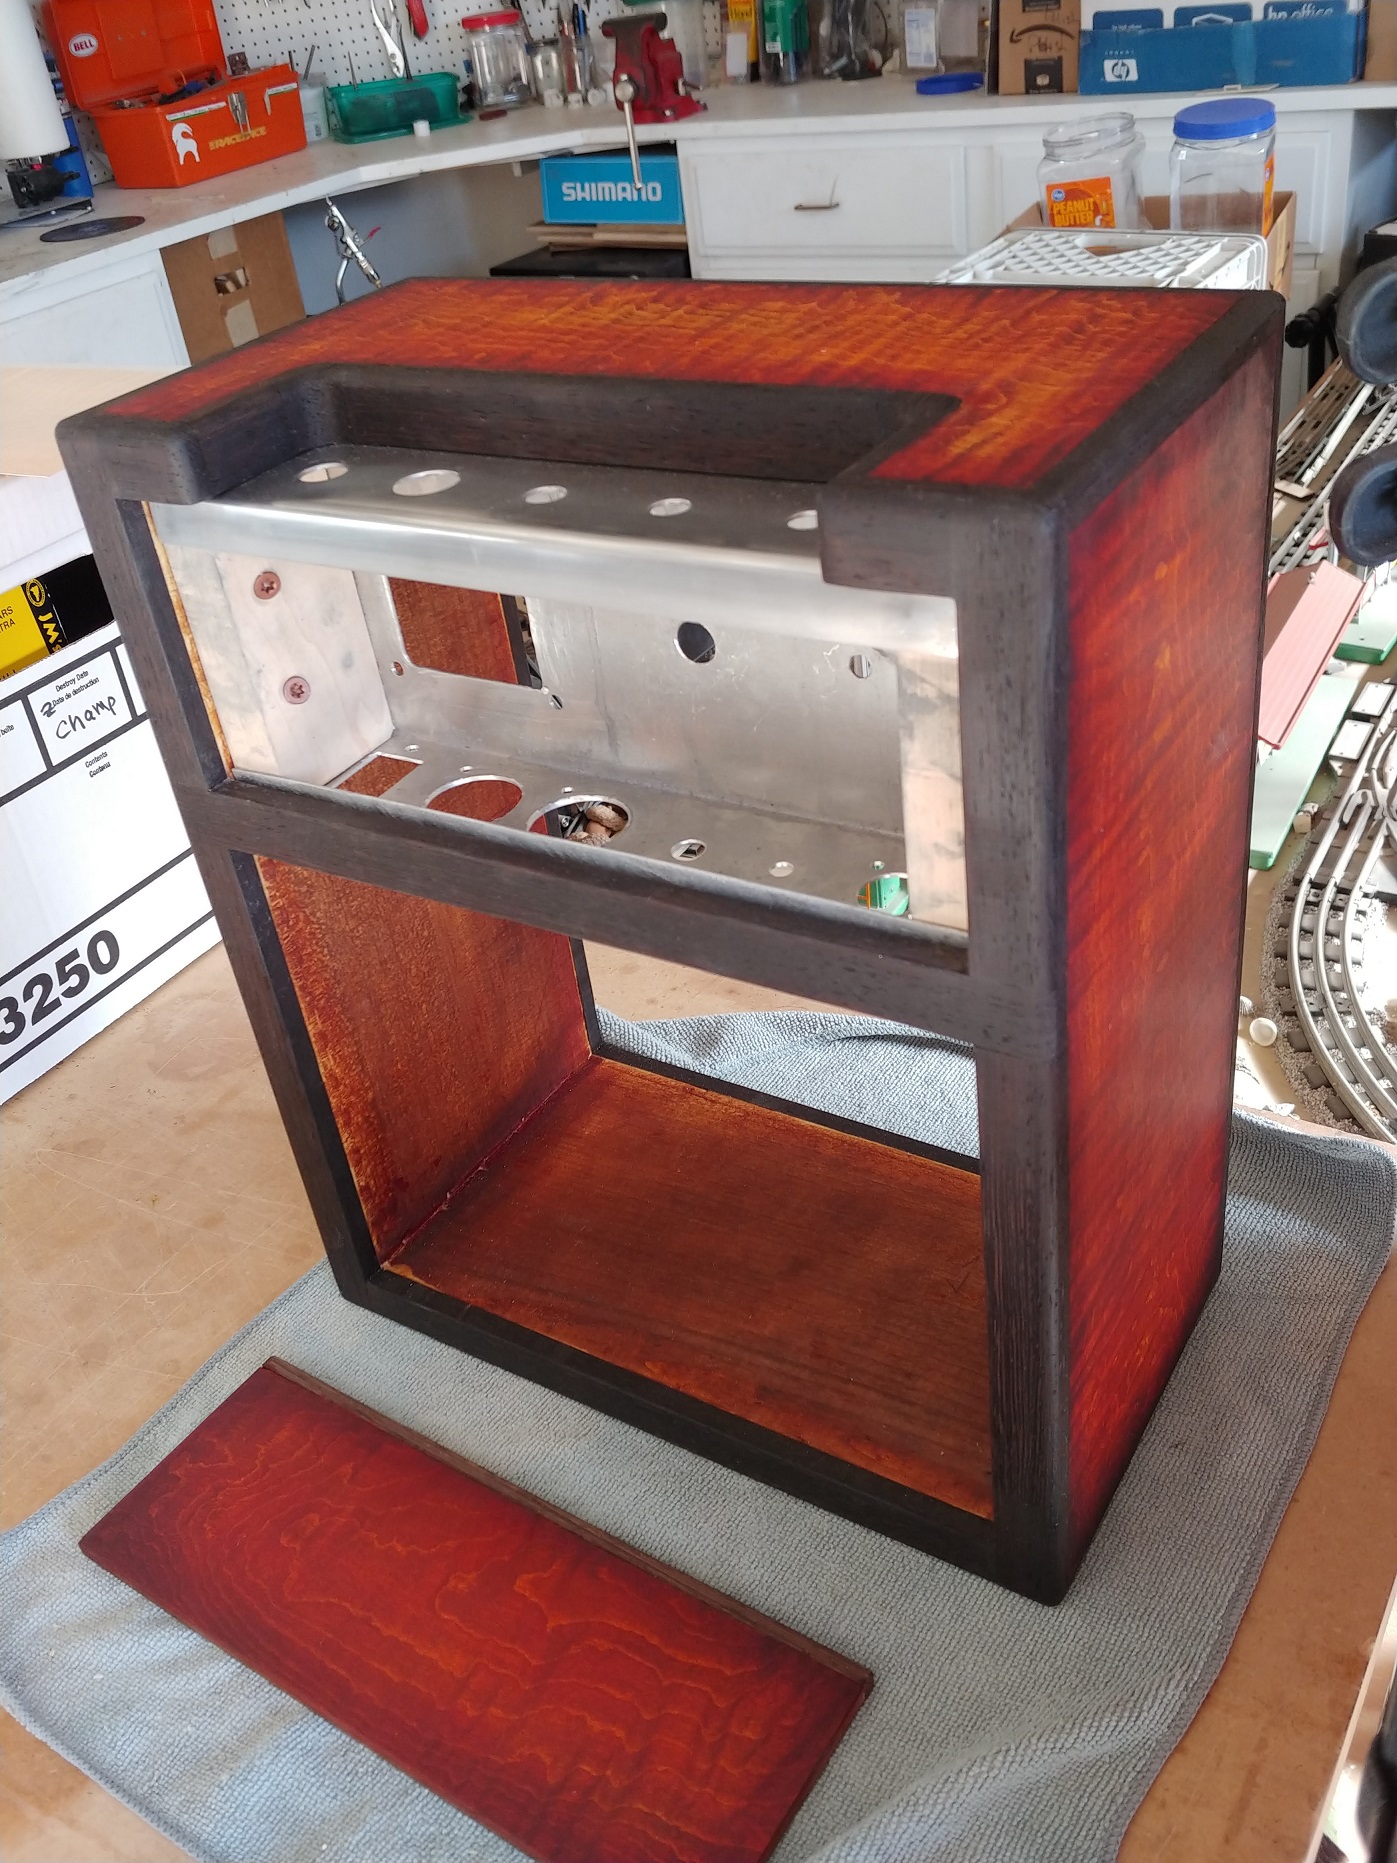
We began to draft a path toward liberation. The plan was practical: we would fabricate a separate cabinet for the amplifier head, allowing the chassis to travel without the anchor of the massive 18-inch speaker. We intended to modify the output, creating a way to drive an external 8-ohm cabinet with ease. As the project grew, our ambitions shifted toward the internal architecture. We began to ask, why not optimize one channel for the shimmering highs of a mandolin or the piercing cry of a harmonica, while keeping the first channel dedicated to the low-end warmth of guitar and bass?
It was a tempting vision of versatility, but it brought us face to face with the defining dilemma of restoration. We had already crossed the initial threshold by modernizing the power supply, prioritizing safety and function over rigid originality. But there is a vast difference between making a vintage machine safe and fundamentally altering its voice.
The question hung in the air of the workshop: should the original design remain sacred, preserved in its mid-century purity, or do we have a duty to alter it to fit the reality of a modern player? It is the age-old struggle of the collector and the craftsman. To change the amp is to make it useful, but to leave it alone is to respect its history. We were forced to decide whether we were serving the machine, or whether the machine was meant to serve us. It is a tension that lives in every repair—the constant negotiation between keeping the past alive and building a bridge to the future.
1- The B18N Chronicles: A Restoration Journey
The Ampeg B18N arrived on my bench as a formidable piece of sonic history—heavy, imposing, and clearly hiding a story in its wiring. While a previous owner had already installed a three-prong power cord, a deeper inspection revealed that the safety work was purely cosmetic. The fuse and power switch were wired in the wrong order, and the dreaded "death cap"—the capacitor connecting the mains to the chassis—remained, a classic trap for the unwary.
Upon closer inspection, the amplifier’s history was written directly onto the circuit board. I discovered that two bias resistors had been replaced long ago—a telltale sign of a past failure. Beneath them, the charred, carbonized board bore a permanent scar, a "fossil record" of excessive heat that hinted at a prior catastrophic tube event. It was a stark reminder that this machine had been pushed to its breaking point long before it ever reached my bench.
The Spark and the Replacement
My restoration began with a focus on reliability. I set out to modernize the safety circuit by removing the positive lead of the death cap, thinking that leaving it on the board would retain the original look of the layout without posing a risk. In my effort to secure the wiring, however, I failed to notice a small solder bridge that had formed during the installation. When I powered the amp on, that hidden connection sparked violently against the can capacitor mounting area.
I immediately assumed the spark had destroyed the can capacitor. Convinced it was the source of the trouble, I removed the original reservoir and can capacitors and replaced them with modern, discrete units. I expected the noise to vanish. It did not.
The Grounding Revelation
It was only after the can cap was replaced that I realized the instability remained. I turned my attention back to the "death cap." I had already removed the positive lead, but the ground wire remained connected to the chassis. Thinking this might be the culprit, I severed that ground connection entirely.
The result was instantaneous and deafening: the amplifier erupted in a roar of unruly noise. It was a terrifying sound, but it was also a revelation. In that moment, the true state of the internal grounding became clear: the death cap ground had been providing the entire ground reference for the chassis. By cutting it, I hadn't just removed a hazard; I had effectively unmoored the amplifier from the earth. The "silence" I had sought was replaced by a static-filled void. It was a poor manufacturing design approach that never should have been, but it was now my problem to fix.
Reconciling Design with Reality
This discovery was a pivotal lesson. Simply modernizing the components wasn't enough; I had to dismantle my assumptions and rebuild the grounding architecture from the ground up, moving toward a centralized, reliable power distribution scheme.
With the grounding finally resolved and the power section stabilized, the amplifier fell silent, but a new, subtle problem emerged. As I began to stress-test the circuit, I discovered the B+ voltage was significantly higher than the 119 volts specified in the factory schematic. My local wall voltage, hovering around 125 volts, translated into a B+ rail peaking at a treacherous 575 volts—pushing my new capacitors toward their absolute limit.
I was left with a critical choice: rely on higher-voltage components to survive the stress, or correct the environment in which the amp lived. The path forward was clear. While upgrading to 600-volt capacitors would provide a necessary buffer, true restoration required me to bridge the gap between vintage design and modern power.
I chose to integrate a Hammond 166M10 bucking transformer directly into the chassis. By wiring this in a series-opposing configuration, I effectively dropped the incoming line voltage to the target 115-volt range, providing a permanent solution that protected the amp's internals. This process transformed the B18N from a fragile, voltage-sensitive antique into a reliable workhorse. It was a journey of trial and error, moving from the danger of an improvised ground to the clarity of an engineered solution—proving that restoration is less about returning to the past and more about finding a way to make history endure in the present.
2 - The B18N Chronicles: A Restoration Journey
The Ampeg B18N arrived on my bench as a classic, heavy, and formidable piece of sonic history. When I first inspected the chassis, it was already equipped with a three-prong power cord, a modification likely added by a previous owner. However, appearances can be deceiving. A deeper look revealed the classic danger signs of a vintage amp that had been improperly modernized: the "death cap" was still in place, effectively connecting the mains to the chassis, and the power switch and fuse were wired in the wrong order. This was not the safe, reliable machine it needed to be.
Safety Under Pressure
The restoration began with the intention of bringing the amplifier up to modern safety standards. I set out to correct the power entry, swapping the switch and fuse into their proper sequence and removing the death cap positive connection, thinking that leaving it on the board will retain the original look of the layout. In my efforts to secure the wiring, I failed to notice a small solder filling that had bridged a connection. When I powered the amp on, that hidden connection sparked against the can capacitor. It was a jarring, unintended event that fundamentally compromised the filtering section of the amp. I assumed the can capacitor had failed, leading to a cascade of issues that required immediate attention.
Thinking this might have been caused by leaving the death cap ground connected, I removed that ground. When I powered up again there was a terrible noise, thinking this was the result of the Can cap death (where the spark occurred). First step was to replace the reservoir cap and can caps with modern equivalents. I removed and replaced the original caps when during the grounding of the new caps, I discovered that the ground of the death cap was used to ground the entire amp. This was a poor design approach from the manufacturer that never should have been. This was likely the cause of the noise rather than the original can cap. Nevertheless, the new caps had already been installed and are a better and more modern approach.
The Ghost in the Grounding
During this phase, I removed the original can capacitor and replaced it with modern discrete caps. I hoped this would resolve the noise, and while it was a necessary step for reliability, the underlying instability caused by the poor grounding design persisted until I addressed the power distribution directly.
The situation deteriorated when I cut the death cap’s ground path. Without that connection, the amplifier suddenly erupted in a loud, unruly noise. It was at this moment that the true state of the internal grounding became clear: that death cap had been providing the entire ground reference for the amplifier chassis. With the path removed, the amp was essentially floating, creating a feedback loop of hum and static. This discovery was a pivotal lesson in vintage circuitry; the silence I expected had been replaced by a roar that forced me to reconsider every assumption I had made about the amp's internal architecture.
Voltage and the Modern Reality
With the grounding resolved and the power section stabilized with modern capacitors, the amplifier was quiet and functional, but a new, more subtle problem emerged. As I measured the performance, I discovered that the B+ voltage was significantly higher than the 119 volts specified in the original factory schematic. My wall voltage was hovering around 125 volts, which translated into a B+ rail peaking at nearly 575 volts. This was pushing the capacitors toward their absolute limit.
I was left with a critical decision: should I simply replace the components with higher-voltage 600-volt capacitors, or should I correct the environment in which the amp lived? The restoration had evolved from fixing a broken machine into a deeper engineering project.
The path forward was clear. While upgrading to 600-volt capacitors would provide the necessary safety margin, the true restoration required me to bridge the gap between the vintage design and the modern power grid. I chose to integrate a Hammond 166M10 bucking transformer directly into the chassis. By wiring this in a series-opposing configuration, I could effectively drop the incoming line voltage back to the 115-volt target, providing a permanent solution that protected the amp's internals. This final touch transformed the B18N from a fragile, voltage-sensitive antique into a reliable workhorse, proving that restoration is less about returning to the past and more about finding a way to make history endure in the present.
The Outer Shell: Resurrecting the Soul of the B18N
The electronics were only half the battle. While the amplifier chassis provided the voice, the cabinet was the body—the silent partner that had weathered decades of use. When the Ampeg B18N first reached my bench, it appeared as a monolithic, unremarkable black box. It had been subjected to the indignities of past owners: amateurish spray paint, layers of grime, and a "sad," darkened grille cloth that seemed to have lost its spirit long ago. I initially viewed it as a utilitarian object, something to be covered and ignored in favor of the circuitry inside.
The turning point came when I began the cleanup process. As I carefully removed years of accumulated neglect, a ghost emerged from beneath the surface. It wasn't the dull, uniform black I had assumed; it was the iconic, geometric "Blue Diamond" Tolex. Somewhere along the way, a previous owner had tried to impose a modern, flat-black aesthetic over a piece of design history. My own initial attempt to touch up the scuffs with wood stain was a misstep, a testament to the friction between wanting a quick fix and respecting the material. It was a humbling reminder that shortcuts in restoration often lead to more work, not less.
The grille cloth presented a similar challenge. It had become a monochromatic, stifled mesh, its silver threads choked by paint and dirt. Restoring it required a choice: force an artificial perfection or honor the machine as a survivor. I chose to work with the cabinet rather than replace its history entirely. By methodically stripping away the layers of misguided paint and treating the Tolex with the care it deserved—using specialized protectants to re-hydrate the material—I began to see the original patterns emerge from the haze.
I faced the temptation to perform plastic surgery on the cabinet, to scavenge pieces of Tolex from the hidden corners of the chassis to patch the scars of its past. But I realized that to erase the wear was to erase the story. This amplifier had earned its bare patches on the road; they were the callouses of a machine that had survived decades of heavy lifting and late-night loading. Instead of faking a ‘newness’ that wasn't there, I focused on making those ‘wounds’ clean and intentional. I sealed the edges and let the history stand. The amp doesn't look new, but it looks honest—and in the world of vintage gear, honesty is the rarest finish of all.
The result is not a "new" cabinet, but a resurrected one. The Blue Diamond pattern now shows its age with dignity, and the cabinet once again feels like a cohesive whole with the restored electronics inside. It is a lesson in patience. In restoration, the most important work is often the invisible work: the cleaning, the stripping back of previous errors, and the steady hand required to reveal what was there all along. Bringing the cabinet back to life taught me that if you are willing to look past the surface—and willing to undo the mistakes of those who came before you—history has a way of revealing its true colors.
Beneath the Weave
Opening the speaker cabinet felt less like repair and more like archaeology. The baffle board showed the scars of a life lived hard, with paint flaking away and a constellation of mysterious staples driven into the wood where they did not belong. It was a smoking gun, evidence of a previous owner who had been driven to distraction by a phantom rattle and had attempted a desperate, failed field repair to quiet it.
I stripped the baffle back to its bones, sanding and repainting the surface to seal the wood and provide a clean foundation. Rather than resorting to the brute-force tactics of the past, I opted for precision. I applied a 1.6mm layer of acoustically transparent felt, not to muffle the speaker, but to provide a mechanical buffer between the grille cloth and the baffle. It was a quiet engineering choice, a way to ensure that the cloth would have a soft landing rather than vibrating against the wood.
The urge to reach for the spray adhesive was there, but I let it pass. Glue is a shortcut that creates a permanent, messy legacy, one that seals off the fabric and complicates any future work. Instead, I trusted the mechanical tension of the cloth, pulling it taut against the new felt cushion until it sat perfectly flat. This is the difference between a quick refurb and a restoration that respects the instrument. When the amp is finally back on the stage, those ghost rattles will be gone, silenced not by heavy-handed chemicals, but by careful, deliberate craft.
The Cost of a Quick Fix
The restoration was nearing its end, but the amplifier had one final lesson for me: the cost of the quick fix. The volume knob, which should have been a secure mechanical marriage between the set screw and the D-shaft, was a stubborn mess. When it refused to budge, I discovered why: some previous owner, rather than simply tightening the set screw or replacing a missing fastener, had glued the knob directly to the potentiometer shaft. It was a bonehead move—the kind of shortcut that inflicts permanent damage for the sake of an afternoon's convenience.
Removing that knob was a delicate operation, requiring me to painstakingly pick away the rock-hard epoxy that had been forced into the threads and down the shaft. When it finally popped free, it came apart in a clean break, forcing me to repair the plastic with cyanoacrylate adhesive. It was a frustrating, surgical process that left me questioning why someone would choose such a destructive path when the engineering solution was already sitting right there in front of them.
When I finally reinstalled the repaired knob, the victory was bittersweet. The pot works, but it carries the memory of that trauma. The rotation is no longer the silken, precise movement it once was; it has an odd, gritty feel—the lingering resonance of someone else's laziness. I plan to introduce some Deoxit into the mechanism, hoping to soothe the internal track and smooth out the sensation, but for now, I have decided to let it be. It serves as a daily reminder of the primary challenge of vintage restoration: we are rarely just fixing the wear of time. We are constantly working to undo the damage of people who favored haste over integrity. The amp works, and the knob stays, but the experience has reinforced my belief that in this craft, the right way is the only way worth doing.